by Daniel Naftali
A can of oil sprayed incorrectly, an oil leak from the brake system or the fork: there are lots of reasons that can bring brake pads in contact with oil or other lubricants.
When this happens, the pads absorb the lubricant with disastrous results; instead of braking, the pads slide on the rotor, causing inefficient braking. It’s impossible to use the bicycle in these conditions so something must be done. Today, we’ll see some tricks of the trade to restore the use of contaminated pads.
The problem
Due to a worn washer at the base of the outer leg, the fork’s oil has escaped, inexorably soaking the rotor and the brake caliper. The result is a front brake that doesn’t work as it should. This is not an insignificant contamination; suspension oil is extremely difficult to remove.
The oil, contaminating the pads, has made the front brake inefficient; even when squeezing the brake lever tightly, the wheel continues to turn. So, it is difficult to ride in this condition…
The first thing to do is evaluate whether it’s worth intervening. If the pads are almost completely worn, it’s better to replace them. However, as in our case, since the pads are new or still in good condition, throwing them away would be a shame; it would be worth trying to clean them.
I say “try” because recovering contaminated pads isn’t always possible. First, we must avoid letting the brake lining absorb the oil. The longer we wait, the worse the situation. It happens that in some situations the contamination is such that pad recovery is impossible. In this case substitution is the only alternative.
To work: removing and cleaning.
The loss of oil was significant and has contaminated the lower left area of the fork. Brake caliper, adapter bracket and rotor are all covered and the oil has caused dust, which in this season abounds on the trails, to adhere to the surface. This is an utter disaster!
1) Removing the wheel and extracting the pads: we begin by removing the wheel and the pads from the brake caliper.
To remove the pads, each model has its own procedure. For “The One” system, the pads are removed by unscrewing the cotter pin and pulling the pads towards the rear of the caliper.
2) Cleaning the rotor: after removing the wheel we can clean the rotor. Unlike the brake pads, the metal rotor doesn’t absorb oil. Just the same, the heat and the dirt can form a blackish layer on the braking surface. This layer of burnt oil and dirt must be removed. In addition, oil tends to remain trapped in the rotor’s cooling vents, with the risk that it will contaminate the pads after cleaning. Therefore, it’s important to clean them attentively.
To clean the rotor, we use isopropyl alcohol, a chemical intended for cleaning rotors or, as an alternative, ethyl alcohol. If we have one, a good cleaning with a degreasing detergent and power sprayer doesn’t hurt; it helps remove oil from the cooling vents. Use a slightly rough but strong cotton cloth while cleaning. This will help remove the oily layer from the rotor.
3) Caliper cleaning: the oil has also dirtied the brake caliper. The oil, mixed with dust, creates a paste which can block the pistons. Therefore, we must clean everything with care.
Using the isopropyl alcohol, intended for cleaning brakes or, if not available, ethyl alcohol, carefully clean the external as well as the internal surfaces of the caliper. Clean the two pistons, removing them individually. In this way we eliminate all oil residue that would cause dirt and dust to stick to the mechanism, and damage the piston movement.
At this point we move on to the pads. There are several ways to clean them and we’ll start with the least invasive but also the least effective.
Method 1: washing
The first method is very simple and involves washing the pad.The washing method is fine if the pad has been contaminated recently and the oil hasn’t been absorbed.
First, with a piece of absorbent paper, dab the surface trying absorb as much oil as possible.
Next, start cleaning the pad using isopropyl alcohol and or a degreasing agent such as Chante Claire. Personally, I prefer using alcohol first, followed by the degreaser. With a brush and lots of water I try to remove residual substances by scrubbing with care. Then I use the isopropyl alcohol again and remove any trace of detergent. It works very well and the degreasing agent doesn’t ruin the pads in any way, (after all, it’s a detergent). Beware, some industrial degreasing agents may contain lubricants. You run the risk of making the situation worse!
Method 2: burning the pads!
It seems crazy but in reality fire is an excellent system for cleaning pads. If you think about it, lubricating oils are often made up of hydrocarbons and these are highly combustible substances. The pads are made of refractory material, very resistant to heat, thus this method is not as absurd as it may seem.
Since the flame is extremely hot, I don’t recommend using this method with organic pads. The resin that makes up the brake lining in these pads tends to crystallize at high temperatures and the pads run the risk of hardening, thus losing their stopping power. Personally, I only use this technique on semi-metallic and metallic pads.
This method is simple: holding the pad with tweezers, face the brake lining toward the flame. Bring the pad to the flame and make several passes over it. Don’t hold the pad over the flame for more than a couple of seconds; this avoids overheating and the resulting vitrification. With two or three passes over the flame, the oil should burn off completely.
With this procedure completed, place the pad down and allow it to air cool. It will be very hot so wait before touching it.
More than likely, a thin crust of shiny material will form on the pad’s surface. This means that the brake lining has vitrified superficially. This is not a problem since the next step will remove the layer.
Method 3: Sandpaper
Generally, the oil is absorbed by the superficial layers of the brake lining; therefore, removing these layers will bring the non-contaminated material to the surface.
In addition, sandpaper is a recommended procedure if one uses the burning method (described previously). It serves to remove the superficial layer that has vitrified.
So, obtain a sheet of fine grain (120) sandpaper and place it on a flat, smooth surface (such as a table or floor). It’s very important to have a smooth surface to ensure the brake lining is rubbed uniformly.
Place two fingers on the pad and without applying pressure, move the pad in a circular motion on the sandpaper. There is no need to press hard since the sandpaper will quickly remove the brake lining and you will see a blackish residue appear.
If we only have to remove a vitrified layer, only a few circular passes over the sandpaper are necessary. On the other hand, if we have to remove a contaminated layer (for example, if we’re working with organic pads where a flame cannot be used), we must continue the procedure with more passes.
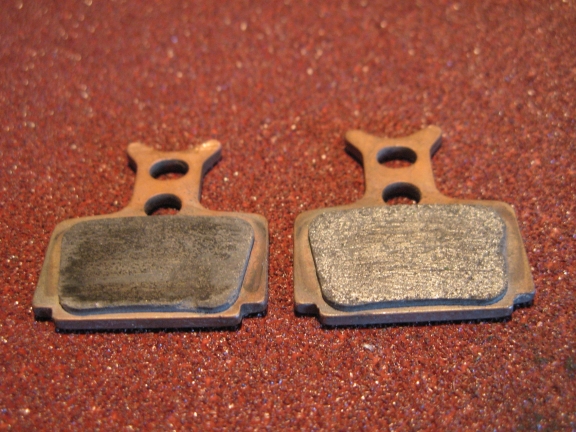
Once finished, the result is as seen in the image:
On the left we can see the pad after the treatment. Note how the contaminated oil has been removed and the brake lining is clean. Instead, on the right we see that the pad, even though diligently cleaned, remains covered with oil.
OK, we’ve now arrived at the moment of truth! We must reinstall the pads in the caliper and mount the rotor.
We can now go to a calm place like the courtyard or a flat road with insignificant traffic to verify that the pads work properly. Sometimes it’s necessary to “road test” the brakes several times before the pads begin to function properly, but if after several abrupt stops the pads don’t improve, there’s little that can be done. We have to clean them again with much more care (including the rotor), or we have to replace them.
We can conclude with a small recommendation: to lubricate the chain, it’s always better to apply oil contained from a bottle. Using a spray can to apply oil can easily lead to aerosol contact with the rotor. This is OK now that we know how to clean the pads, but it’s always better to keep lubricants far from our brakes!