RockShox sent us two different shocks to play with on our Cannondale Jekyll long term test bike. Overall, we’ve been rather impressed by their new Super Deluxe line of Metric sized shocks and have run tests of both the air and coil versions independently. These days, opting for a coil sprung rear shock seems to be all the rage. Particularly on mid travel bikes in the 130-180mm range. We found the Jekyll to be a great bike for making some direct comparisons as it isn’t on the extreme end of things with regard to either leverage ratio or suspension rate. More on that later…

For this piece, we wanted to spend some time unpacking some key differences between air and coil sprung shocks from various standpoints. The intention of this article isn’t to make some lofty claim that one is superior to the other. Instead we hope this is viewed as more of a rough guideline to help steer you – the consumer – in the right direction when choosing between air and coil. We’ll dissect factors such as local terrain, kinematics, rider preference, etc…Anyhow, let’s dive in!
Kinematics – Know your bike
If you’re a rider who’s considering an aftermarket shock upgrade for your bike, you’re probably weighing pros/cons, and making some comparisons on which shocks offer more adjustability then factoring that into your decision. It’s important to have a pretty decent understanding of your bike’s suspension kinematics. Within that, there are two variables worth considering: leverage ratio and leverage rate curve.
We want to keep this article relatively simple and avoid diving too far down the rabbit hole as suspension is an incredibly complex subject, but we strongly advise that you do some research on your particular bike before buying an aftermarket shock for it. Does it have a high or low leverage ratio? Does it have a more linear or more progressive leverage rate curve? There are shades of grey within all of these variables as well as how they intersect, but both of them should be factored into your decision between air and coil.
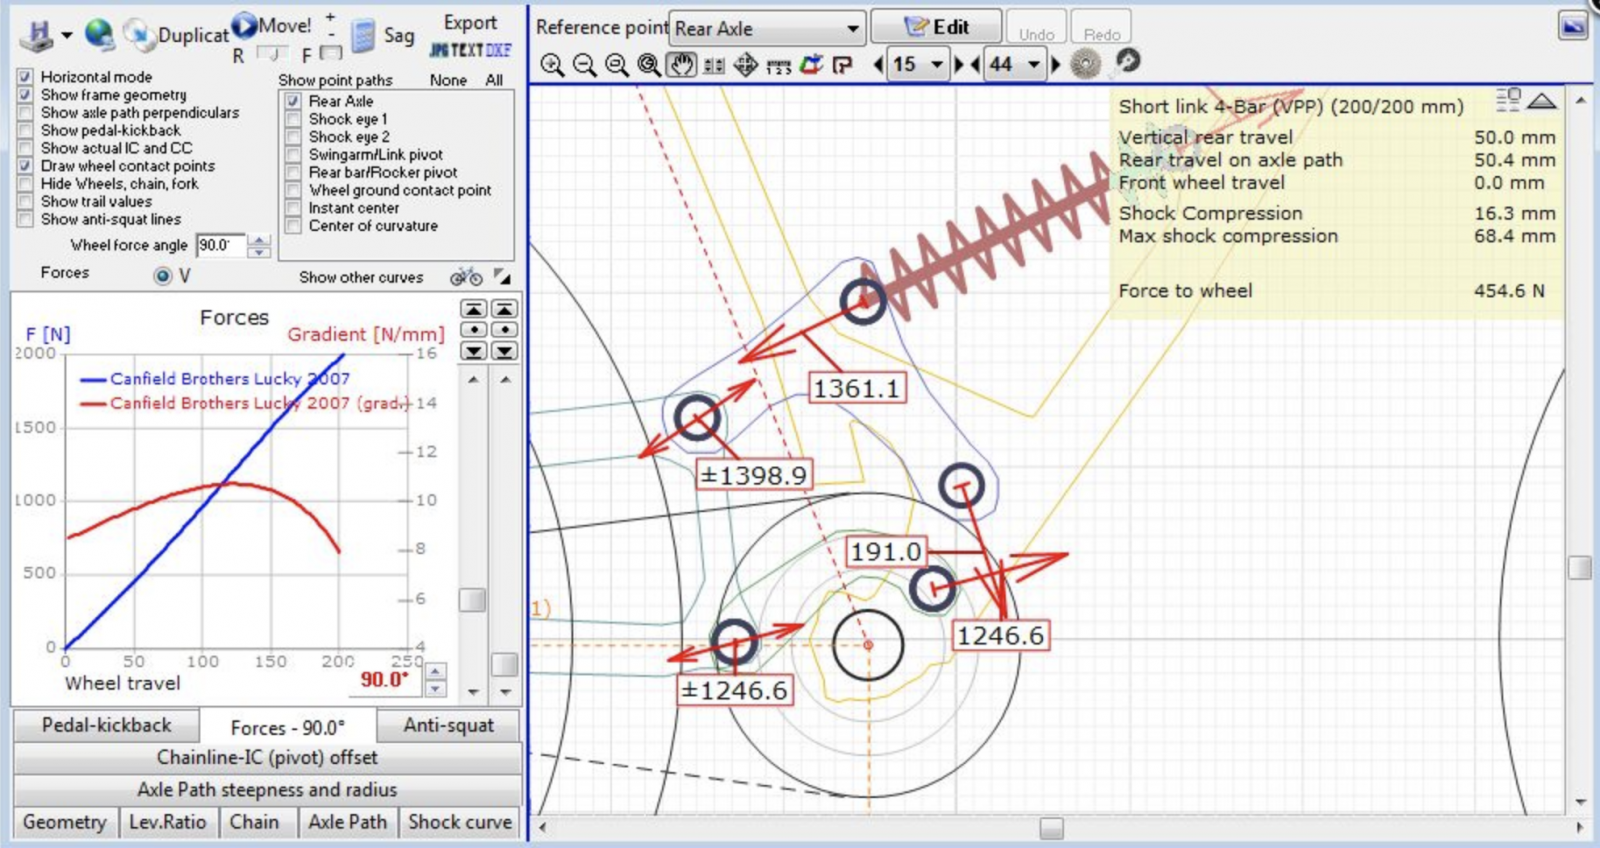
High vs. low leverage ratio
Determining leverage ratio is actually quite simple: take the total rear travel and divide it by the shock stroke travel. Roughly speaking, mountain bikes range from around 2.3:1 (low leverage) up towards 3:1 (high leverage). For instance, the 180mm travel model of the new YT Capra uses 75mm of shock stroke for a 2.4:1 leverage ratio, which is quite low. Conversely, the Specialized Enduro has 170mm of rear travel and utilizes only 57mm of shock stroke for a ~2.98:1 leverage ratio, which is quite high. Thus, a rear shock that’s just right for the Capra, might not be a good choice for the Enduro, and vice versa.
Falling, linear & progressive rates
Frame suspension design is what determines where a frame sits along the spectrum of leverage rate curves. Is your bike a single pivot? Does it have a rate modifying linkage or an axle path modifying linkage? Does its linkage modify both rate and axle path? If so, how much? There aren’t really too many hard, fast rules where we can marginalize certain types of suspension designs as offering specific rates because there are a variety of ways that each design can implemented.
With that in mind, it’s best to do some research on your particular bike. However, that can get a bit murky since most manufacturers don’t really openly provide specific data on their bikes. Linked here is a YouTube channel that has a handful of comparative videos which may help you better understand where your bike stands. Beyond that, general research and reviews can also be of great help.
Factors to consider
Here are a few loose generalizations to keep in mind when choosing between air and coil:
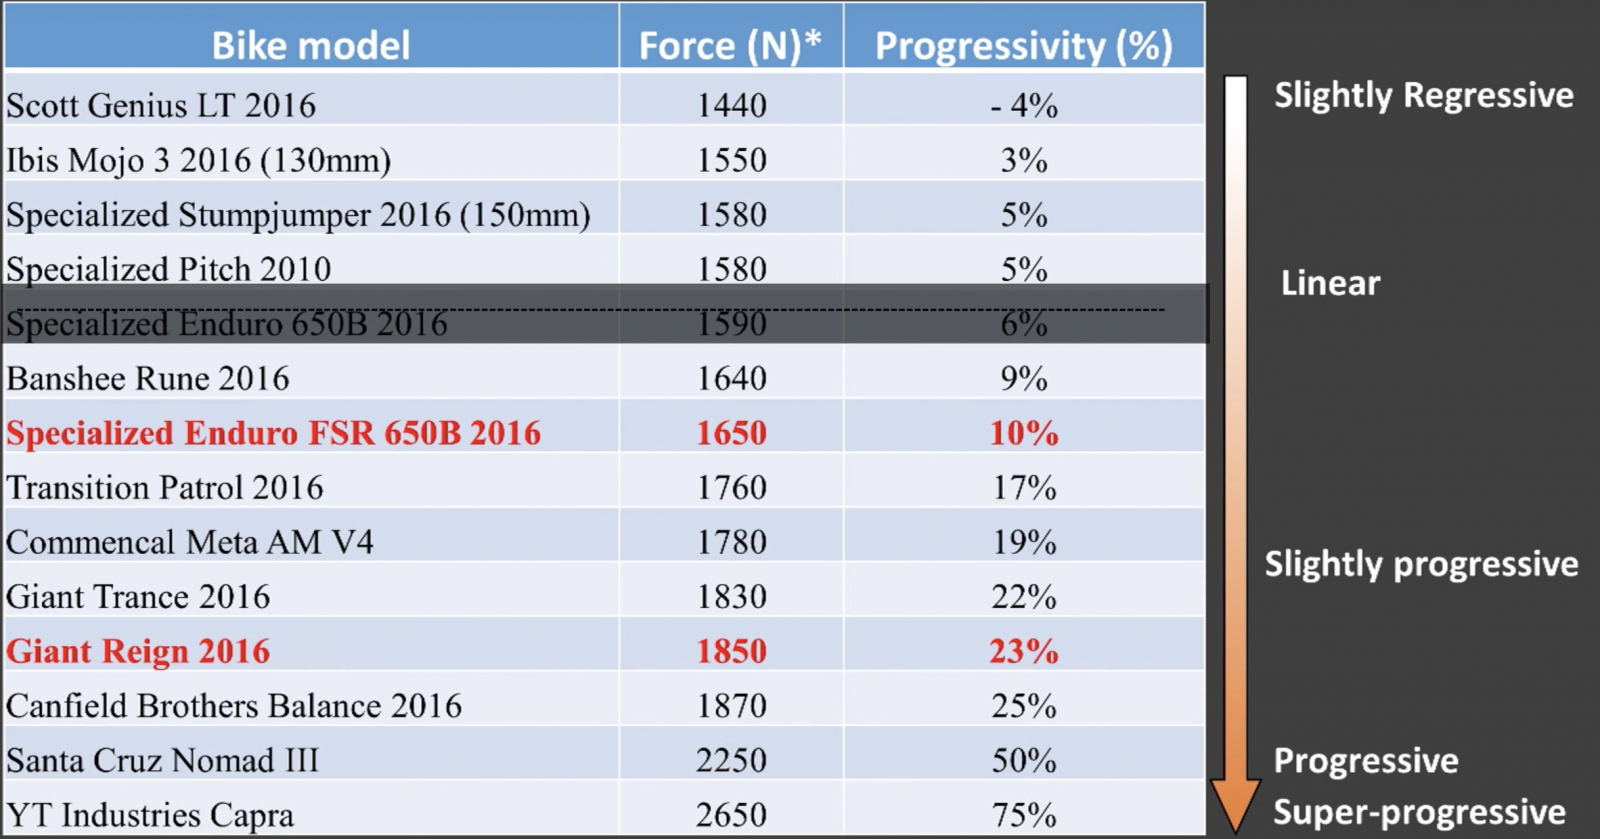
- If you are seeking a more progressive feel, you’ll probably want an air shock. Coil springs are more linear in nature than their air sprung counter parts in both forks and shocks.
- Conversely – if you’re after a more linear feel on a bike that is a bit on the progressive side, you may want to lean towards a coil sprung shock.
- If your bike has a high leverage ratio, chances are good that it’s best to avoid a coil spring unless your bike features a sharp, rising rate linkage (read: progressive). So, a high leverage, single pivot (read: linear) frame will likely blow through its travel and bottom out frequently if you put a coil shock on it. Instead, it’s likely better suited to an air shock with a couple of volume reducers in it.
- Generally speaking, bikes with lower leverage ratios are going to play more nicely with higher volume air shocks. The reverse is also true – higher leverage bikes require lower volume air shocks. These days, engineers are trending toward designing bikes with lower leverage rates, and thus shock manufacturers are designing shocks with higher positive and negative air spring volume accordingly. This is a win-win all around and RockShox’ push toward Metric shock sizing had heavy bearing on this.

On Trail Comparisons
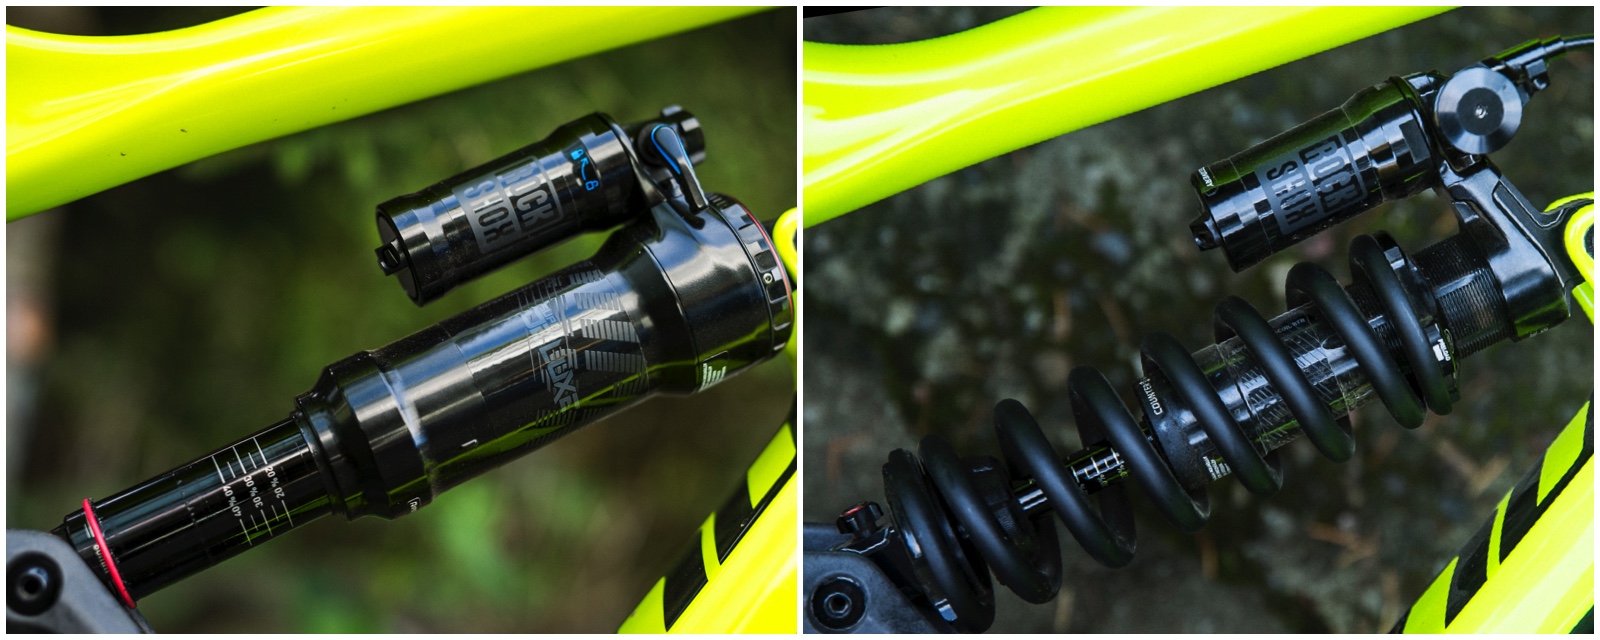
In our particular case, we bounced (no pun intended) back and forth between RockShox’ Super Deluxe RCT (air) and the Super Deluxe Coil RT Remote. To a certain degree, in our review of the coil shock we spent some time dissecting the utility of the bar mounted remote, but that is also available in the air sprung version so we’ll exclude that from this discussion.
Weight
It’s no surprise that switching to a coil sprung shock will tack on some weight. Roughly speaking, with a steel spring, your bike will gain about a pound. If you have the money to spare, you can do some damage control by opting for a titanium spring and on average you’ll add on about a half of a pound. To be specific, in our case there was a 517 gram difference between the coil and air Super Deluxe shocks, excluding the remote/cable. One hang up with the extra weight that come along with a coil is that they’ll mainly appeal to riders with longer travel bikes, which in essence are already a bit more difficult to get up the hill.
Sensitivity (Traction)
It’s no secret that coil sprung shocks have better traction and are typically more sensitive on the trail. This is mainly because there are less seals required. It’s worth pointing out that lately, air sprung shocks have improved massively in this regard. With Metric shock sizing and higher volume air springs, we’ve been trending toward running running 30-50 PSI less pressure in the average rear shock
Less seal friction equates to increased traction as the shock’s shaft can react to directional changes more quickly. So…with regard to sensitivity and traction, coil sprung shocks win – hands down.
Who should be most concerned with this? The short answer is anyone who’s pushing their limits. That includes people who are racing and/or riding super demanding terrain. If you frequently ride rooty/rough/steep/slick terrain you’ll value every bit of traction you can get, so a coil is the way to go. If you’re mainly riding buff trails and bike parks, you’ll probably be quite content with an air sprung shock.
Adjustability
Air sprung shocks hands down take the win here. With a few volume reducers and a shock pump, you pretty much have free reign to dabble with your springs firmness and progression nearly infinitely. A coil shock will require swapping out physical springs which are generally limited to 50 pound increments as opposed to being able to tune by .5PSI on a digital shock pump. Coil springs also cost more money than the plastic volume reducers shown below.

Overall
In short, our bike had a bit more pop and felt slightly more lively with the air spring. This was largely a function of the additional ramp and progression provided by the air spring. With the coil, it felt a bit more glued to the ground and plowed through rough, mid sized hits a bit less fazed than it would with the air sprung shock. RockShox utilize a rather substantial bottom out bumper and tune a fair amount of progression into the hydraulic side of our coil shock, so we didn’t really have any harsh bottom outs with the coil, despite the fact that it felt a bit more linear overall. Some of this was aided by the Jekyll’s mildly progressive suspension rate.
Those are our thoughts and takeaway points. As we mentioned earlier, it’s best to get to know your bike so you can make a better decision as to which type of shock makes the most sense for your bike, riding style and local terrain. We hope you’ve found this guide useful. Please feel free to post any questions, call outs or suggestions in the comments.
Big thanks to www.rockshox.com for the test bits.